
Developing an iPhoto Export Plugin
NOTE: This information is very out of date. It was written with XCode 2 for iPhoto 4, then updated for iPhoto 5. I have not tested this with any later version of iPhoto. Use at your own risk.
This is a tutorial on building iPhoto export plugins. I wanted to have an XML representation of my iPhoto albums in order to build my photo gallery but couldn’t find a plugin that did the job. So I wrote one, learning from Andrew Stone’s instructions and the source code to the Flickr Export Plugin. Since Andrew’s instructions are for iPhoto2, I figured it would be worth documenting the process for more recent versions of iPhoto.
You might want to download the example XCode 2.0 project for reference. It contains all the files you need as well as stubs for the important methods. It should be enough to implement some useful export plugins.
Firstly, I’m talking about iPhoto 5.0.2. It seems the ExportMgr interface changed slightly from 5.0 to 5.0.2 (at least imageDictionaryAtIndex isn’t there any more… or this may just be my overactive imagination).
Set up the project
- Create a new Cocoa bundle project (eg “ExampleExport”)
- Select Project -> Edit Active Target
- Select the Build tab
- Change the Wrapper Extension to “iPhotoExporter”
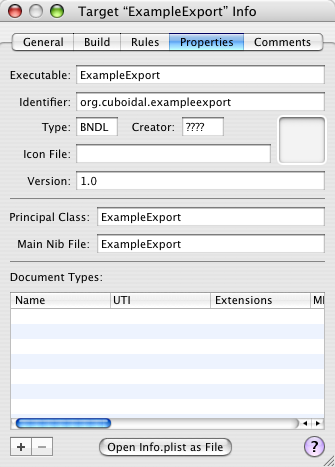
- Select the Properties tab
- Set the identifier to something more useful so you can store user defaults. For example, I set mine to “org.cuboidal.exampleexport”.
You should also set the Principal Class value on the Properties tab to the name of the controller class you’ll create in the next step. In the sample code I use “ExampleExport”. Similarly set the Main NIB file value to the name of the NIB file you’ll create below (again, ExampleExport in the same).
Creating the iPhoto interfaces
You’ll need to get the interfaces iPhoto uses when calling your plugin. You could use class-dump to get the relevant export interfaces, or you could just copy the files from the example source linked above.
For what it’s worth, here’s the class-dump invocation I used:
class-dump -C Export /Applications/iPhoto.app/Contents/MacOS/iPhoto
On my machine this spits out a bunch of warnings. I’m ashamed to say that I ignore them. In amongst all the warnings are interface definitions that iPhoto expects an export plugin to either know about or implement.
The ones you need are:
- ExportMgr (save to ExportMgr.h)
- ExportPluginProtocol (save to ExportPluginProtocol.h)
- ExportPluginBoxProtocol (used in a custom NSBox class, see below)
- ExportImageProtocol (save to ExportImageProtocol.h)
You can include more interfaces if you like but these are the ones that are necessary. As you can see, the ExportMgr interface is pretty comprehensive in itself, and it also implements the ExportImageProtocol. This interface pretty much does everything you need.
There’s a few things you might need to change. ExportPluginProtocol defines the “progress” method with a return type that you won’t understand (unless you extract the type using class-dump). Since the example doesn’t need a progress bar I changed the return type to (void *). In ExportMgr.h you need to add an include statement for “ExportImageProtocol.h”. I also deleted the member variables (since I didn’t need them and I didn’t want to extract all the classes they use).
Create the Controller class
This is the class that actually does the exporting. I call it a controller, but really it’s just an interface that is called by iPhoto (although it can be a controller for your UI, which we create below).
I created a new Cocoa class called ExampleExport (the same name as we specified in the build target earlier). This class should implement to ExportPluginProtocol that we extracted from iPhoto above.
Here’s the important bit in ExampleExport.h.
#import "ExportPluginProtocol.h"
#import "ExportMgr.h"

@interface ExampleExport : NSObject <ExportPluginProtocol> {

  IBOutlet id firstView;
  IBOutlet id lastView;
  IBOutlet NSBox *settingsBox;

  ExportMgr *exportManager;
  ...
You need the three outlets for some methods in ExportPluginProtocol. For example, the settingsBox is the NSBox that iPhoto will add to its “Export” panel. We’ll initialise them later.
At this point you can also add outlets and targets to your class so that Interface Builder can see them, or any helper functions you think you’ll need. The example code doesn’t have anything like this.
Create the custom NSBox
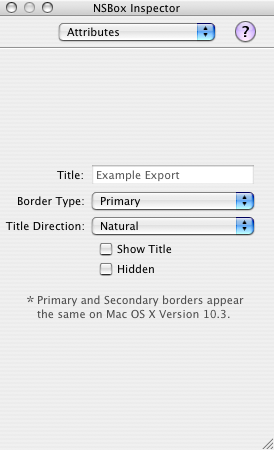
When exporting, iPhoto displays a tabbed window allowing the user to select one of the export methods. Each tab contains an NSBox that implements the ExportPluginBoxProtocol (which we extracted using class-dump above). It is a very simple interface. Here’s the header file for our custom NSBox (a new class called ExampleBox).
@protocol ExportPluginBoxProtocol
- (char)performKeyEquivalent:fp16;
@end

@interface ExampleBox : NSBox <ExportPluginBoxProtocol> {

}
And here’s the implementation.
@implementation ExampleBox

- (char)performKeyEquivalent:fp16 {
  return NO;
}

@end
Setting up the NIB
Start up Interface Builder. Start from an empty Cocoa project. Add a panel, then add a Box to the panel. The title of the Box will be used in the iPhoto export tab, so pick a nice name. I turned off the “Show Title” checkbox.
At this point I save the NIB file in the project directory (remember to use the name you specified earlier in the project preferences), Interface Builder asks you if you want to add the NIB to the project, which you do.
Now drag the controller and custom NSBox header files from XCode into Interface builder. This adds the definition of the classes to IB. Next select the “File’s Owner” and set the custom class to the controller. Connect the “settingsBox” outlet in the File’s Owner to the Box you added in the panel (ie control drag from File’s Owner to the Box). You should also connect the firstView and lastView outlets, although we haven’t added any controls to the box yet. For the moment, connect them to the Box. Lastly, select the Box and set its custom class to the custom NSBox class you created earlier.
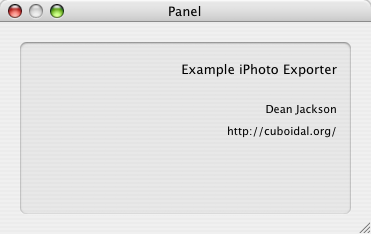
Now it’s time to add UI controls to the Box. You don’t need the Export and Cancel buttons, they are provided by iPhoto. The example code doesn’t have any active controls, but it does have a few static text fields. Note that the size you use for the panel be will used when iPhoto resizes its export window.
The guts
Now it’s time to implement the actual exporting. The example code has stubs for all the methods you need. It logs each method so you can see when they are being called.
Most of them are pretty straightforward and the comments in the stub explain what they mean (in the cases where I understand :). In many cases the method is empty or a single line. There are only two methods with any substantial code. I’ll describe them.
First you have to load the NIB in the initWithExportImageObj method. It’s also worth grabbing a reference to the ExportMgr reference that is passed in.
- (id)initWithExportImageObj:(id)fp8 {
  if(self = [super init]) {
    exportManager = fp8;
    [NSBundle loadNibNamed: @"ExampleExport" owner:self];
  }
  return self;
}
The other is the real guts of the controller: the startExport method. I haven’t included the example source inline here as it’s a little long. The example method uses the ExportManager to iterate over the selected photos, outputting a description for each.
ExportManager is a huge interface. The functions you’ll most likely call are:
- albumName
- albumComments
- imagePathAtIndex
- imageCaptionAtIndex
- imageDateAtIndex
- imageKeywordsAtIndex
- imageComments
At this point you can compile and install the plugin.
Installing a plugin
This bit is quite tedious. You have two choices: the Apple way or the Unix way.
The Apple way involves calling Get Info on the iPhoto application, expanding the “Plug-ins” section, and the adding the plugin that you’ve developed (it’s usually found in ProjectDir/build/ProjectName.iPhotoExporter) If you rebuild your plugin you have to remove and add it again. It doesn’t use the version in your build directory.
The Unix way is to copy the built plugin into the iPhoto plugins directory (/Applications/iPhoto.app/Contents/PlugIns/). I find this step to be much quicker when developing as I leave a terminal window open ready to run the command. It might be possible to set up a Copy Files build phase that would install the plugin, but I haven’t bothered.
Now that the plugin is installed you should be able to start iPhoto and see your plugin in the export tab.
Debugging
To debug the plugin you simply need to set iPhoto as the executable and proceed as normal.
That’s it
That’s all you have to do. The rest is just the soak/wash/rinse/dry cycle of developing the code. I’m hopeful that this document will become redundant soon, when Apple produce their own documentation on plugin development.
If you find this tutorial useful, please let me know. If you use it to build a plugin, then please send me a link so I can check it out.
Enjoy.
Date: 2005-06-07